Sunday, January 30, 2011

First Cook on the new Smoker

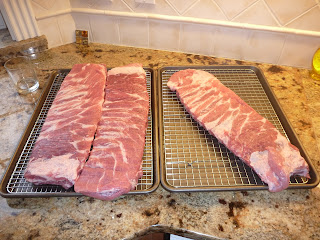
The weather was beautiful this weekend; a great time for the inaugural cook on my new Mak 2 Star General smoker. I set up 3 racks of St. Louis cut ribs which I bought at Cash and Carry; I also did 8 brats from New Seasons of various styles. I normally do baby back ribs but thought I'd try the meatier St. Louis cut this time.

Saturday afternoon

The cooker needed to be "seasoned" which I think really means burning off all the machine oil from manufacturing. So, I loaded in some pellets; turned it to high and let er' rip about 45 minutes.


Next, bust out the ribs and apply the rub.


The rub is Meathead's Magic dust, the recipe for which can be found at here at amazingribs.com. If you are interested in barbecue this is an excellent place to start.

Sunday
After church and swimming, I came home, loaded the smoker with apple pellets and turned in on to 225 degrees. Once it got up to temp at 12:30, on go the ribs for 3 hours. This was so much easier than using the Weber kettle grill with the smokenator. I didn't have to fuss with adding charcoal, wood, water, stirring the goals; sweeping the ashes out. I just set the temp and went in the house to start the barbecue sauce.

A view from the couch through the window.

Time to build the barbecue sauce; this is my favorite tomato based sauce. I got the recipe from Cooks Illustrated magazine; my take on it can be found here


A cool part about this recipe is you make your own onion puree. You chop an onion into quarters, put it in the food processor with a little water and whirl it until it looks like an onion slurpee.


The press it in a wire mesh strainer to get the onion water.


Heat a little oil in the bottom of the pan, bloom the spices for about 30 seconds then add all the other ingredients. Bring to a boil and simmer for 15 minutes.

Back to the ribs after a couple of hours.

After 2 hours of smoking,  I add the links; they show up on top here, but I put them on the side first and moved them upstairs after they cooked a bit.

After 3 hours of smoking, I put the ribs in foil with a little apple juice and back on the heat for 40 minutes. Then they came back out of the foil boats for another 40 minutes to firm up. 
Then I fired up the gas grill to high, moved the ribs over there, painted them with sauce and sizzled the sauce for a few minutes on each side. Here they are when all was done.

The smoke ring doesn't show through here; need to work on my picture taking skills

 Dinner is served.

Summary
They were easy to make, but they weren't my best ribs ever. They had a nice mild smoke flavor, but were a little tough and didn't have a rich meaty pork flavor. The smallest rack was the best leading me to think that they should have cooked longer. But that's part of the fun; figuring out what works and what needs work.

Tuesday, January 25, 2011

January 25, 2011 - The Mak 2 Star General

The next cooking blog post won't have pictures Ol' Blue in it. I finally broke down after a year and bought a pellet smoker. I rented one last year for Father's Day and enjoyed the ribs I did on it. I spent the summer working on smoking on my Weber gas grill and Weber kettle grill. The kettle was promising but I had to lift the lid too much to tend the coals, water, and smoke. If your lookin' you ain't cookin'; I'd loose heat every time  the lit came up adding to the cooking time. The gas grill is better in this regard; the lid can stay on; but at the low smoking temps; it's tough to get enough smoke.

So, having a gas and charcoal grill; I figured it was only logical to get a wood cooker. I saved my nickels and dimes and was able to order a Mak 2 Star General just after Christmas. I had my eye on the newer smaller one; but Carla was listening when I was on the phone with Big Poppa's Smokers and she told me "just get the big one; you know it'll be better". "Okay dear, whatever you say; I just want to cook you dinner".

They were working on some changes for the new model year; so it didn't ship until last week. It was delivered on a big pallet Monday. I unboxed it Monday night; then tonight Jeff came over and helped me assemble it. It took 2 hours from opening the bag of screws to finishing the clean up so I can park back in the garage.

Covered up. This is actually the back side of the cover; but the front side emblem is a little loud for my taste. The cooker is symmetrical, so it was easy to just turn the cover around. 


Tucked in bed for the night with the Weber gas grill; the charcoal grill is stored behind me in the picture.


It promises to be sunny this weekend so we'll be having summer in January: ribs, slaw, potato salad. Saturday  morning I'll head to Cash and Carry to pick up some St. Louis cut ribs; I'll rub them up overnight, then smoke them on Sunday probably with some brats on the upper rack. 

January 23, 2001 Chicken Rosemary Stew

This was on of my early recipes, coming from the old Food Network show How to Boil Water. It's a very simple recipe with a big payoff in taste. It has 41 reviews with a 5 star rating showing its popularity
You can find the recipe here.  The treat of this recipe for me is the carrots, they cook in the chicken fat for a while and then stew for 40 minutes and come out so sweet and tender.

or my version here.

I first made it back in 2003 or 2004 when Carla's parents Glenn and Tommie were coming over for Sunday dinner every week.  Glenn was very allergic to to celery, so I had to make it without. It was so nice to have them over to dinner; thinking about it makes me sad.

I'll spare you the line up before the cook. Here the chicken thighs have been fried for about 8 minutes.

Next, in goes the carrots and celery to saute until tender; about 10 minutes (these are big chunks of vegetables)


We add the broth and the chicken goes back on top; be sure to keep the skin above the liquid


Serve over noodles

Yum. Easy and tasty.

January 9, 2011 Chili with Beans!

Uh oh. I've been so vocal and demonstrative about my views of beans in chili, I'm really in for some teasing from everyone. I love  El Cid chili; but I read an article in the January 2011 Cook's Illustrated that looked delicious; beans or no beans.  My take on the recipe can be found here.

The ingredients; oh yeah. Notice this also has beer!


The intriguing part was that I would make my own chili powder by toasting some chilies and grinding them up in the food processor; then turn it into a paste with some garlic, chicken broth and other stuff. Here the dried chilies are toasting


Yes, it's Ol' Blue again. I love this pot. It gets a big workout in the winter. Here I've made the chili paste and have cooked it down with a lot of pureed onion.


We sautee the meat; add some more liquid (including the beer) and stick it in the oven for a couple of hours until it looks like this:


 This chili is sooooo tender and delicous. I'm still a fan of El Cid more than this but everyone else who tried it loved it. So, I'll make it again.